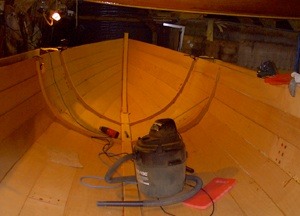
The view from the stern. Once back inside, I leveled everything I could think of and then blocked the hull to keep it from moving. Note the clamping points to hold the hull in the correct position along the sheer. The inwales (shelf) will go in very soon, as will the bulkheads at station 2, the aft cabin, and station 8. First we have to clean up any excess epoxy inside the hull. At this time I am also planning for the installation of the bilge board cases and slots. Shopvac keeps it all tidy inside.

The enemy. This is the glue that squeezed out between the planks on the inside of the hull. Sometimes you can clean it up as you glue the planks, but the plywood clamps made that a little difficult so we have to clean it up now. This hull isn't too bad as the amount to clean up is minimal. Too little squeeze out and I'd wonder about the joint's integrity.
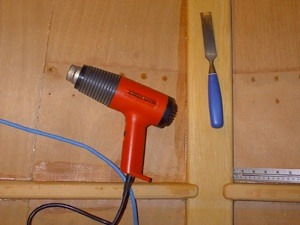
My new best friends, we'll be spending a lot of time together over the next while. I heat the excess cured epoxy and then scrape the softened lump off with a sharp chisel. While not difficult, it is slow, dull, repetitive work, but necessary for a good finish later on. Station 4 frames have already been cleaned up.

The rudder tube is now permanently in place. While slightly off the centerline, the alignment with the heel fitting on the deadwood is very good and is vertical both side to side and lengthwise along the boat.

Finally the forward section of the boat is free from glue lumps and bumps. Everything got a good sanding, followed by a coat of epoxy resin. A little glue residue can be seen along the plank edges but these will be covered with an epoxy fillet. The designer specifies a fillet along many joints for strength. Fillets also make the interior smoother and easier to clean. No dirt can hide in the corner if there are no corners.

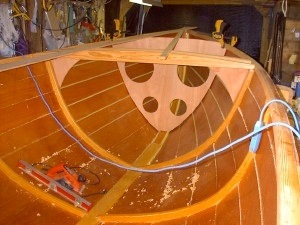
The large beam for the mast at station 3. Another will eventually be positioned 4 inches aft of it. The shelf (inwale) is now in place as well. I wanted the beam installed as soon as possible to help the boat keep it's correct shape. These beams will also have plywood knees to tie the hull and deck structure together.

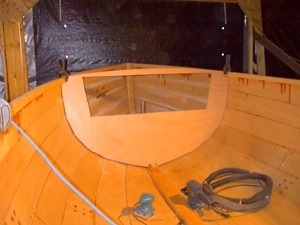
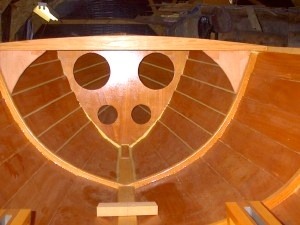
The bulkhead at station 2 receives its shelf beam. The shelf divides the bow compartment horizontally providing flotation below (with access through two watertight hatches) and storage above (access through two 12 inch circular cutouts). Obvious flash problems on these two pictures.

The plywood knees at station 3 are now installed. These are made of 1/2 inch plywood and add some of the strength needed to support the rig.
Meanwhile, at the other end of the boat, the station 8 bulkhead is tried in place. Eventually there will be a motor well just aft of the bulkhead, the mizzen mast box will go just behind the rudder tube, followed by the sub deck and finally the deck proper. As my friend Mike said, there is an awful lot of work to do in the last few feet of this boat.

After waiting impatiently for some warmer fall weather, I finally gave up and sanded and coated the remainder of the interior of the boat. Keeping the resin and hardener warm, mixing thoroughly, and quickly applying the resin to the hull, I managed to get it done. The boat was then covered with a tarp and a small ceramic (1500 watts) heater was placed inside. It was a nice 25 degrees C. inside, while the outside temperature was somewhat below 0. This photo shows the aft view as it will be until spring. You can just make out the keel bolt holes along the keelson.

This shot shows the view forward. Frame 4 is in the foreground with frame 3 with its plywood knees behind. I've filleted all but the bottom two plank laps. Filleting adds some strength but also makes it a lot easier to keep the inside of the boat clean.
Bulkhead 2 is (still) temporarily in place and the two deck beams have been roughly faired with the trusty power planer. Final fairing will be done with a hand plane. The battens used for fairing are still in place.
A closer view of the floor at the aft cabin bulkhead location showing the recess for the silicon bronze keel bolt and nut to be added later on. We laminated three layers of very nice Douglas Fir to make these pieces.

The hull doublers that the chain plates attach to go in next.